
Set up your team
What to configure before you start selling — your business details, taxes, payment methods, the messages your customers receive, and the words the system uses for your own line of business.
Control Total is built to be used by any business that sells something, which means it arrives without knowing yours. This guide walks the settings screen once, from top to bottom, so that by the end the system carries your name, charges what you charge, offers the payment methods you accept, and speaks the way your business speaks.
You reach it from Settings in the sidebar, under Administration. It needs the permission to edit settings, so if you cannot see the entry, ask whoever administers your team. The entry is also hidden while you are working inside a branch — switch back to the team to change its settings. See What Control Total is.
The screen is titled Manage team. On the left is your logo and a few team-wide actions; on the right, a box of tabs holding most of the settings.
Your logo
At the top left, Team picture. Press Change picture and pick a JPG, GIF or PNG of up to 5 MB. This image is what appears at the head of your quotes, your sell orders, your PDFs, your thermal tickets and the public pages your customers open, so it is worth uploading a real one before you send anything. See Send documents to your customer.
The logo is kept in your team's Media and uses part of your team's storage space. If that space is full, the new logo is not saved and a message tells you so; free some up by deleting files you no longer need in Media, or get more space, and upload it again.
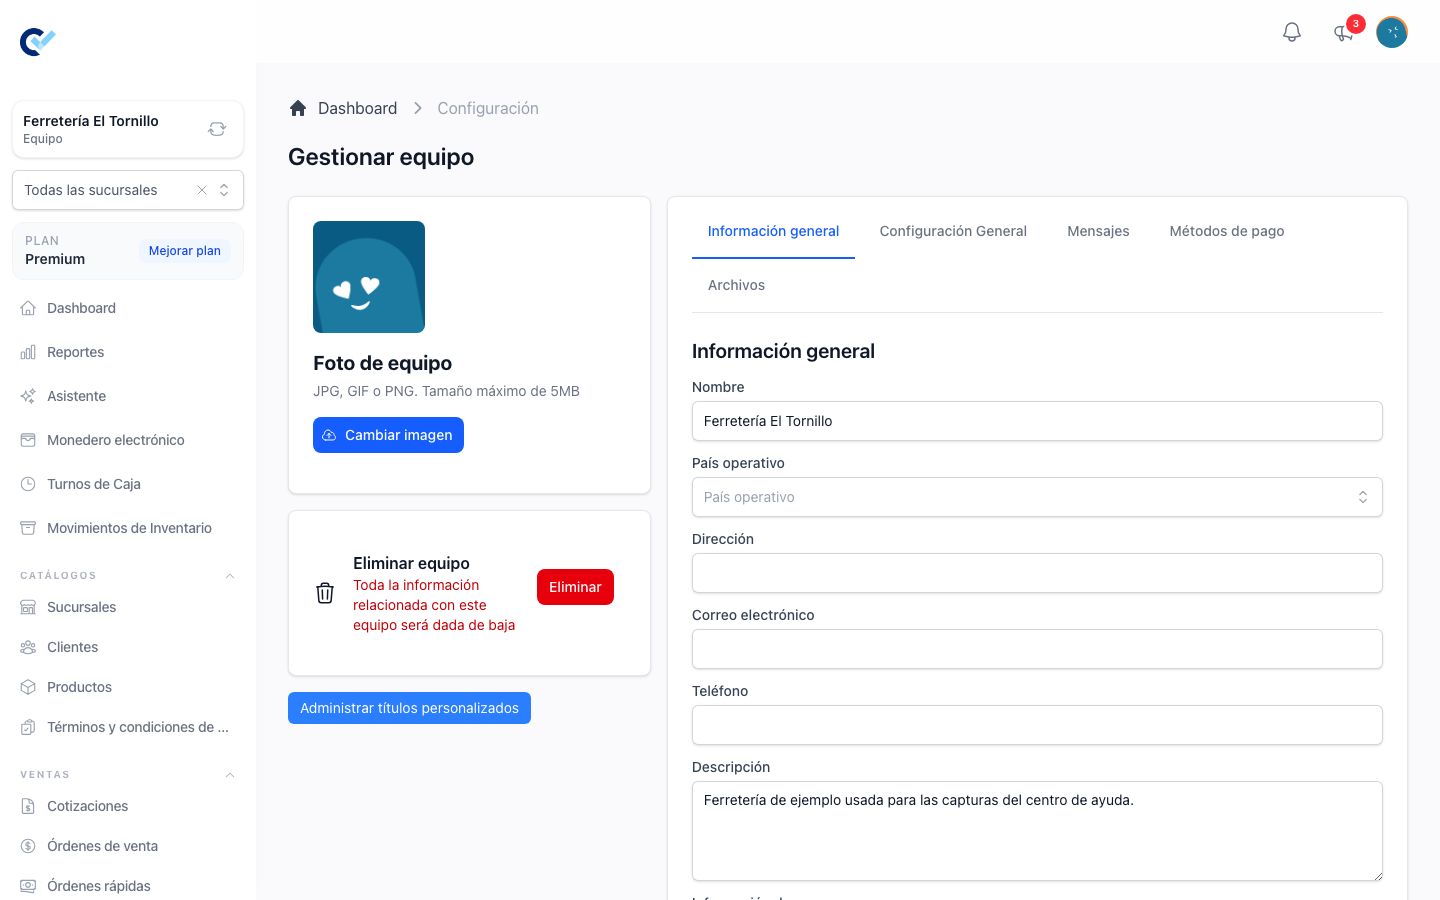
General information
The first tab holds who you are.
- Name — your business name, shown everywhere.
- Business type — the line of work you are in: professional services, distributor or wholesaler, stationery store, hardware store or grocery store. It is the one thing Control Total asks you for when you create the team, next to the name, and a team cannot be created without choosing one. This is where you change it if you picked the wrong one. A team created before the field existed shows it empty and works exactly as it always has — pick one and it is saved like any other setting.
- Operating Country — required, and more than a label: together with the fiscal invoicing module it decides whether you can issue fiscal documents at all, and which country's rules apply when you do.
- Address, Email and Phone — printed on your documents and shown at the foot of the public pages, so a customer reading a quote knows how to reach you.
- Description — a short line about the business.
- Payment Information — free text with your bank details or payment instructions. It is printed on quotes, on the quote PDF and on the quote ticket, which saves your team from typing account numbers into every message.
Press Save at the bottom of the tab. Each tab saves on its own.
General Configuration
The second tab holds how the system behaves day to day.
- Days for Quotes — how many days a quote stays valid. After that it counts as expired, and the public page tells the customer the prices may have changed. See Create a quotation.
- Credit Card Commission — the percentage your card processor charges you, written whole:
3for 3%,3.5for 3.5%. Control Total works out the commission on every payment taken by credit card, so your real income is what you see. A payment already collected keeps the percentage it was charged with, even if you change this later. - Decimals for Productos — how many decimal places product prices use.
- Transaction Reference Required — when on, a payment by credit card or transfer cannot be saved without its validation or authorisation number. Turn it on if you reconcile against your bank. See Register a payment.
- Fast Order Default Client — the customer a fast order is assigned to when nobody picks one, so a counter sale does not stop to ask. See Cashier shifts.
Two more appear only if your installation has the matching module enabled for your team:
- Electronic Wallet Available and Accumulation Percentage — turn the wallet on for your customers and set what share of each payment is credited back to them as balance. A single customer can be given a different percentage from their own record.
- OpenAI API Key — your own key, for the assistant features.
Taxes
If your team is not issuing fiscal invoices, this same tab has Activate taxes. Turn it on and a Tax settings list appears: press Add tax, give each one a Name — whatever your customers see on the document — and a Percentage. Add as many as you charge, and remove one with the bin next to it.
These taxes then apply to your products, and a single product can override them from its own form when it is taxed differently.
If your team does issue fiscal invoices, this section is not shown at all: taxes come from the fiscal rules of your country instead, and a separate Invoicing tab appears alongside the others for everything fiscal. See Issue a CFDI invoice.
Messages
Three boxes, one per kind of document you send: Quote, Sell Order and Debt. Whatever you write here is the message that appears, ready to send, when someone on your team presses Send by whatsapp.
Write {url} wherever the link to the document should go — that is the only placeholder, and Control Total replaces it with the document's own public address when the message is built. Everything else is your wording.
Each box shows the default message greyed out. Leave a box empty and that default is what your customers receive. See Send documents to your customer.
Payment Methods
Control Total already knows cash, credit card, debit card and bank transfer. This tab adds five slots of your own — Custom Payment Method 1 through 5 — for whatever else you take: a wallet app, a delivery platform, store credit, a particular bank.
Name a slot and it appears in every list where a payment method is chosen. Leave it empty and it does not appear at all, so your team is never asked to pick between blanks.
Files
The PDFs Control Total generates already carry your logo, your details and your items. This tab lets you add your own text above and below them, written in Markdown, with a separate header and footer for Quote and for Sales Note — which is the sell order.
Use it for the things that belong on every document: warranty terms, return policy, a delivery note, a thank-you line.
Local Configuration
Below the tabs sits a box that behaves differently from everything else on this screen: Local Configuration, for thermal printing. As the box says, these settings are stored only in the browser you are using, for the current team. They do not travel to another computer and they are not shared with your colleagues — each device is set up once, by whoever works at it.
Turn on Activate thermal printing and choose a Thermal printing mode: normal browser printing, or QZ Tray for silent ESC/POS printing, which also lets you pick a paper size and select the printer. Always print fast orders prints the ticket automatically as soon as a fast order is created. The full walkthrough is in Send documents to your customer.
Features
At the bottom right, a box named Features with two checkboxes:
- Inventory — track stock for your physical products.
- Product Variation — sell the same product in sizes, colours or other variants.
These two are yours to switch on and off whenever you want; press Save in that box.
Every other module — the electronic wallet, reservations, branches, purchase orders, fiscal invoicing, pricing packages, physical inventory, accumulated debt, cash register closing, internal orders, terms and conditions, the assistant — is not set here. Those are enabled for your team from the administration panel, by whoever runs the installation. If a section this guide mentions does not appear on your screen, that is why: ask for the module rather than looking for a switch.
Rename things to match your business
Control Total ships with default names — Quote, Sell Order, Client, Product, Supplier, Branch — and none of them is fixed. A clinic has patients, not clients. A workshop takes work orders, not sell orders. A rental business has units, not products.
Press Manage custom titles, on the left of the settings screen. It opens a window where you:
- Select menu — choose which part of the system you are renaming.
- Singular title — what one of them is called.
- Plural title — what many of them are called.
Save, and the new name replaces the old one in the sidebar and across the screens of that section. The list below shows everything you have renamed, and each row can be edited or deleted to go back to the default.
Renaming is per team, so your wording is yours. Only the names change — the documents behave exactly as they did. Renaming needs its own permission, separate from the one for the rest of this screen.
Note that the help centre, this guide included, uses the default names. If your team has renamed something, read "sell order" as whatever you call it.
Leaving or closing the team
The last block on the left is Delete team if you own the team, or Leave the team if you do not. Either one asks you to type the team's name to confirm, which is deliberate: deleting a team takes everything in it with it.
A sensible order to do this in
If you are starting from nothing:
- Upload the logo and fill in General information.
- Decide taxes, or set up Invoicing if you issue fiscal documents.
- Name the payment methods you actually accept.
- Write the three messages.
- Rename anything that does not sound like your business.
- Set up thermal printing on the machines that need it.
Then create your first product and your first customer, and sell something. See Products and stock and Create a sell order.